This week in my Wilton cake decorating class we learned how fill and ice cupcakes and how to make several types of flowers. Our “homework” was to make cupcakes, filling, and icing. We only had to bring six but a box of cake mix makes 24, so I had a bunch to practice on! I just used a box of Pillsbury chocolate devil’s food cake mix and altered it like I told you last week (one extra egg, 1/2 cup extra oil, etc.) and made a batch of the basic Wilton icing. The filling was what I was most excited about. You know how I have a massive blog crush on Amanda from Kevin & Amanda…well, I’ve been drooling over these Snickers cupcakes she made and so I decided to use her chocolate mousse filling for my cupcakes.
Shut. The. Front. Door.
The filling was incredible. It exceeded anything I could have ever imagined. I wanted to stick my head in the bowl and eat it all. If you learn nothing else from my blog, you must make this mousse! And the best part, it’s super super easy.
All you do is take 2 cups of heavy whipping cream, pour it in your mixer (I’m sure you could do this with a hand mixer or even by hand, but I used my KitchenAid and it was a breeze), use the whisk/beater attachment and turn it on. Let it do its thing until the the whipping cream turns into whipped cream and starts forming stiff peaks. I didn’t time this, sorry. Meanwhile, melt two cups chocolate chips in the microwave. When the whipping cream turns into whipped cream, pour in the melted chocolate and mix gently.
Then try not to eat the whole bowl.
It was amazing. So amazing that I almost just left it the way it was, but I had already planned a different idea so I went ahead and tried it out. After I made the mousse I divided it into three containers: in one I added a little instant coffee to make a mocha filling, in one I added a little peanut butter to make a peanut butter chocolate filling, and in one I added some orange extract to make an orange chocolate filling. They were fantastic, too! So many choices…The mocha was my favorite of the three flavors that I added. Michael loved the orange, you couldn’t really taste the peanut butter – I think if I really wanted a peanut butter filling it would be better to go with making a peanut butter mousse using whipping cream and peanut butter chips rather than adding it in later to the chocolate. Just my opinion though.
But the plain chocolate and the mocha…yes, please. I have found a new love!
Just a note, though. If you are going to use this mousse to fill cupcakes (which we learned this week where you put the long tip down in the cupcake and push the filling in), fill the cupcakes right after you make the mousse. I made my mousse the night before and refrigerated it (since it contained cream) and the next day, even though I let it sit out for an hour before I tried to fill the cupcakes, it was too hard and wasn’t as fluffy. It was so hard to pipe the filling through the bag into the cupcakes – it was an absolute mess and some of them didn’t get hardly any filling because I was squeezing so hard but couldn’t get the filling to come out. Later, I microwaved some of it for just a few seconds and that made filling them so much easier, but I’d recommend just waiting to make the mousse until you need it.
Ok, enough about filling…on to the point of this post – decorating! (but seriously, go make this mousse – you will thank me later)
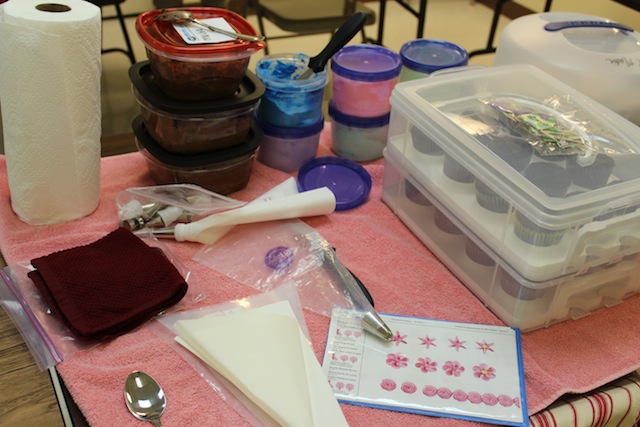
 Here’s part of my work station before class started (there’s a lot more behind me on the counter): paper towels (you use lots!), wet washcloths (icing is sticky!), the three fillings, icing tinted six colors, icing bags, tips, practice board, cupcakes (that carrier is fantastic – it has slots to nest each cupcake in so they don’t tip over, or you can flip the white trays over and use it for two sheet cakes or cookies…here it is if you want one)
Two bad things about this class (that are still worth it to put up with) is 1) how much stuff you have to haul from your house to the class (my largest 31 bag is full each time plus I have a cake or cupcake carrier in addition to that) and 2) the cleanup afterward. Oh my stars, the cleanup….Michael and I spent forever last night washing all the containers, icing bags, and tips, and we didn’t even finish – we ran out of hot water! But it’s still worth it because I’ve learned so much in just three weeks.
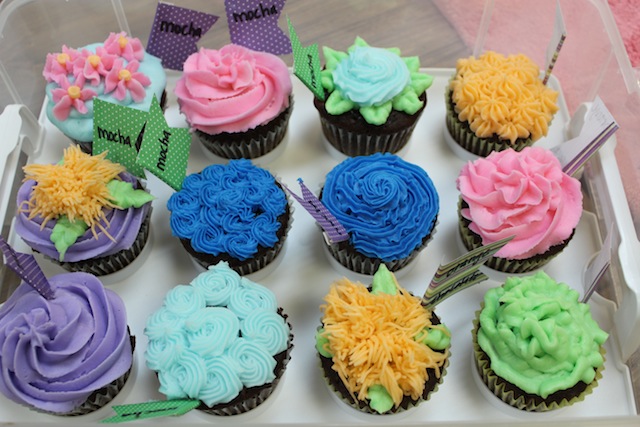
We moved fast this week in order to get everything in, so I didn’t have time to take pictures during class (nor did I want to get sticking icing all over my camera) – here are my finished cupcakes:
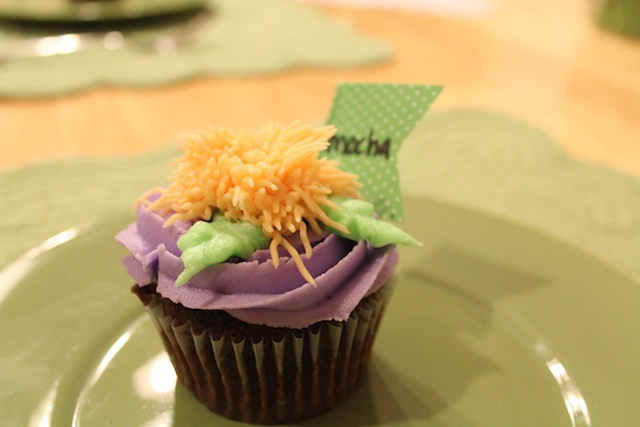
 We learned how to do drop flowers (the pink flowers with the orange center on the top left cupcake), a basic icing technique for cupcakes (the plain purple and pink cupcakes), leaves (they’re in green on some of the cupcakes), shaggy mums (the orange hairy looking ones, rosettes (the light blue cupcake on the bottom row is covered in rosettes), and pom pom flowers (I don’t have one here so point out). Some of these (like the crazy green one at the bottom right) weren’t done using a technique we had learned, I was just experimenting with the different tips and colors. The orange one in the top right corner was decorating in the stars that we learned our first week.
We learned how to do shells tonight but I didn’t put them on my cupcakes because that would look weird and because they were pretty hard for me to do and I didn’t think they looked very good.
I also made little flags to indicate which cupcakes had which fillings since I had three.
 Here’s part of my second tray (I waited until I got home to fill and ice the last 8). The top left corner (the light and dark blue one) is the pom pom flower that we learned.
 As soon as I got home we had to eat one, of course. This was Michael’s.
 and this was mine (I like a lot of icing!)
 This was one of my favorites – love those little flowers!
close ups
 Even with all that clean up we had to do, I would still go right now and make a whole ‘nother round of these! I have so much fun making them and I think it will be even more fun when I’m at home in my own kitchen and not rushed. If you know me in real life, expect to see some of these at any event that I can justify bringing cupcakes to…
Stay tuned for next week: we’ll learn how to make roses and write on cakes


They look fantastic! I did a Wilton decorating course as well, it was great fun!
Super cute! You guys did a great job! And they look really yummy too! : )
Thanks for linking up at Feature Friday FREE-FOR-ALL!